Food Buzz Badge

Monday, April 30, 2012

Shoulda Coulda Woulda

I meant to post again last Thursday, I really did.  I had the same intent last Friday.

But the weekend?  Forget about it.  Shabbat dinner at a friend's, work, bridal shower, concert, preparing a large tea party that turned raucous and went on for four hours, followed by collapsing in exhaustion.

The reality is that David and I are going on vacation in two weeks, and I don't have enough hours in the day.  And let me tell you, mama needs a vacation.  I'm already dreaming about a cappuccino in a Roman piazza.  And some gelato.  Not to mention wine and pasta.

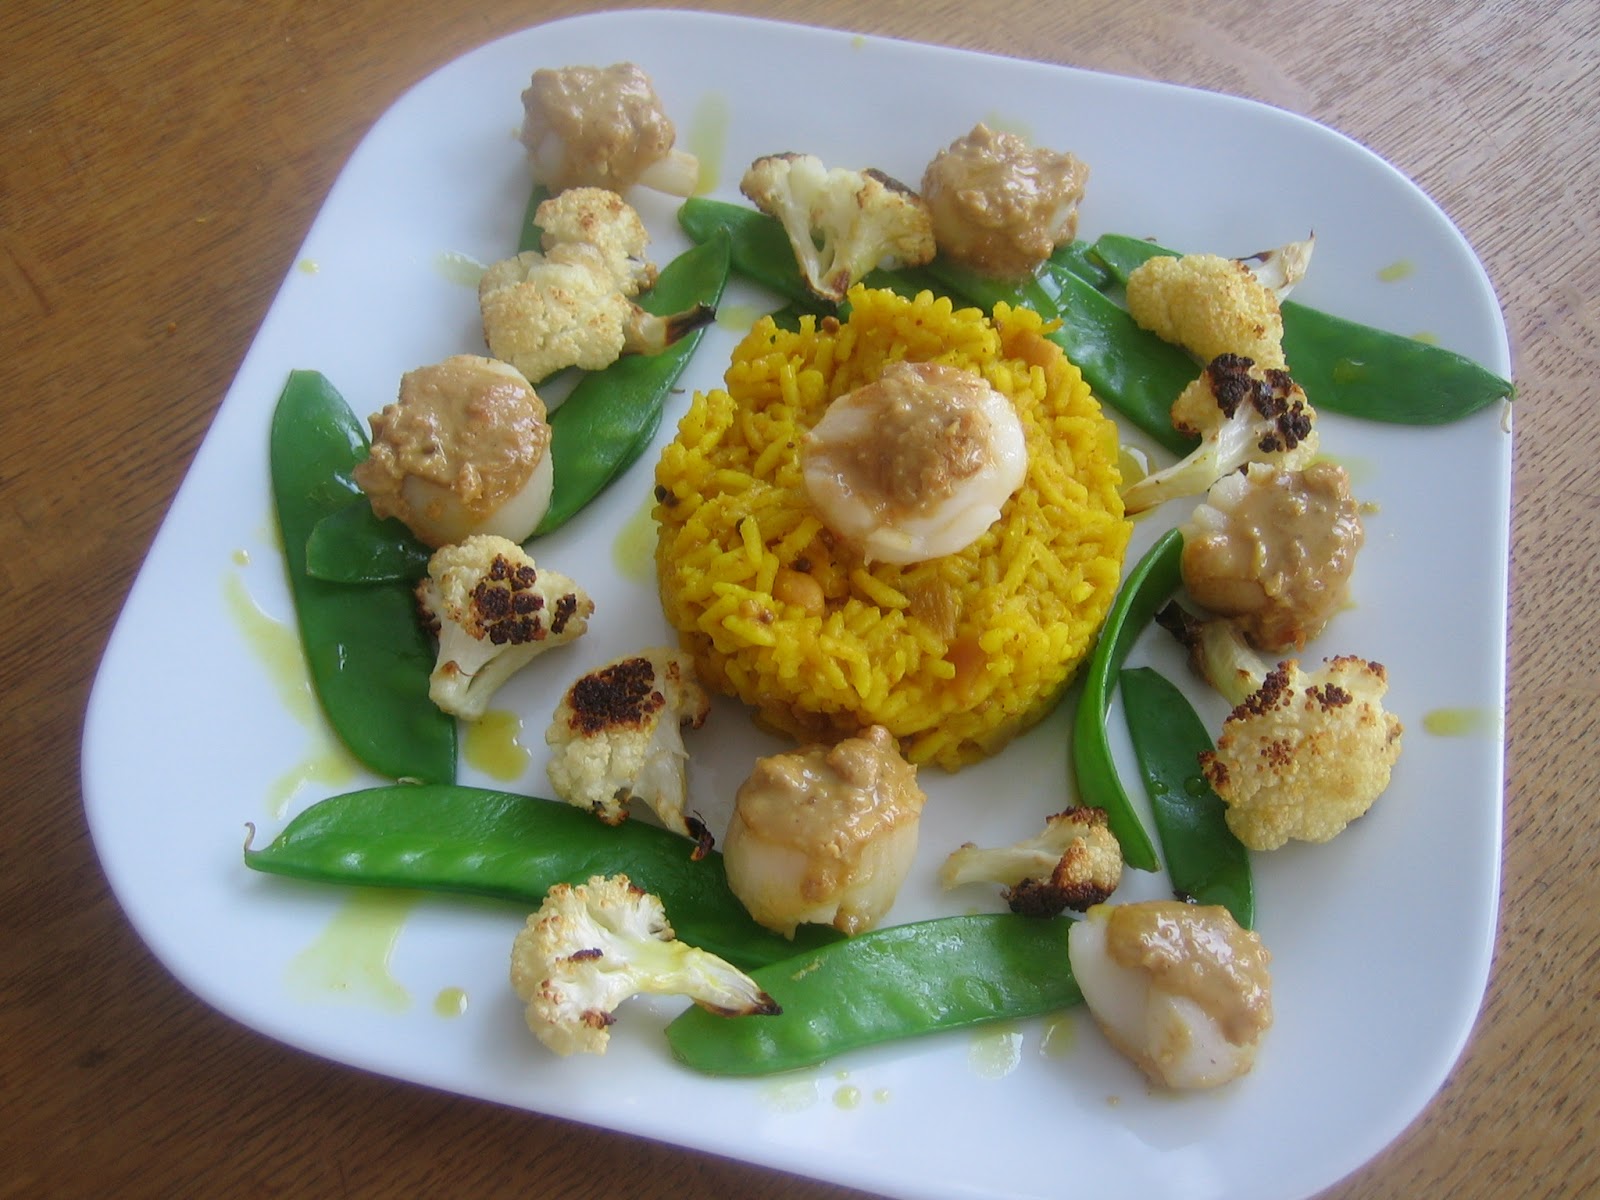
I can't believe it's been a week since I posted the Thomas Keller "easy" seared scallop recipe, which I served with a vividly colored, lemony, spicy rice.  The rice was the perfect accompaniment, and had the virtues of being both easy and fully flavored.  I happily ate rice leftovers for days.  The one thing I didn't get to do was make it into fried rice with some shrimp, which would have been delicious.

A note about this recipe:  I was not trying to make enough rice for a family of giants, which is about how much it actually made.  You could easily scale it back to half a batch and have enough for four side servings.

It does make brilliant leftovers, though.  I might have scowled a little when I realized David had eaten the last of it.

Lemony Spiced Rice
Adapted from Bon Appetit Magazine,
April 2012

2 tbsp. vegetable oil
1 1/2 tsp. yellow mustard seeds
1 1/2 tsp. ground turmeric
1 small yellow onion, coarsely chopped
2 garlic cloves, slivered
1 small poblano, seeded and sliced into thin rings
2 cups jasmine rice
4 large strips lemon peel, yellow part only
Juice of one large lemon
2 tsp. kosher salt
1/2 cup unsalted roasted cashews, chopped

In a large (and I do mean large!) heavy saucepan over medium heat, heat the oil just until shimmering and immediately add the mustard seeds and turmeric.  Stir until the mustard seeds start to pop and quickly add the onion, garlic and chile before the seeds start to pop out of the pan--not that that happened to me, noooo.

Stir the veggies occasionally until the onion is softened, about seven minutes.  Then add the rice, stirring it into the veggies until it is coated with the oil. 

Add the lemon peel and salt, along with three cups of water.  Bring the mixture to a boil, then reduce the heat to low and cover the pan.  Cook for about 25 minutes and then check the rice for doneness.

Remove the pan from the heat, add the lemon juice and stir it in.  Cover the pan again and let it stand, then fluff the rice and remove the lemon peel.  Just before serving, stir in the cashews.

Makes 8 good size side dish servings.


Tuesday, April 24, 2012

A Pox on Your House, Thomas Keller

There was a line in the show I just directed:  "Some words are meant to be spelled, not used." 

My adaptation of that line: some recipes are meant to be aspirational, not made.

I read food magazines on the elliptical at the gym, which is a way to pass the time and dream about food that I don't always want to make.  So when I read the article about chef recipes made easy, I was intrigued.  Despite the fact that one of them was by Thomas Keller.

I know I've said this before, but I pretty much never use my Thomas Keller cookbooks.  They're fun to look at, but I have no desire to spend six hours and every pot in my kitchen making dinner.  But what can I say?  The recipe sounded great.


Two hours later and only most of the pots in my kitchen sullied (what did I DO with all that time?), I concluded that even a simplified Thomas Keller recipe was more than I wanted to do for a weeknight dinner.  But hey, it sure looked pretty, and it was quite tasty except for the fact that the recipe had the vegetables finishing way before you're ready to use them.  I've modified the recipe here to hopefully get everything to the table still warm. 

I was unable to find large sea scallops on the day I made this, but I recommend them if they are available.  That gorgeous, spicy rice recipe will come later this week.

Seared Scallops with Peanut Sauce
Adapted from Food & Wine Magazine, January 2012

2 tsp. hot curry powder
1/4 cup extra-virgin olive oil
2 tbsp. fresh-squeezed lime juice
1/2 lb. cauliflower, cut into small pieces
6 oz. snow peas, trimmed
2 tbsp. panko crumbs
1/4 cup plus 2 tbsp. crunchy peanut butter, preferably natural
1 1/2 pounds sea scallops, preferably large
Kosher salt and fresh-ground pepper to taste

Preheat the oven to 450 degrees.  In a small jar or bowl, shake or whisk together the curry powder and olive oil.  Let this sit for at least 15 minutes, or until the curry settles at the bottom.  Then strain through a coffee filter so the curry is removed, leaving you with just the oil.  Stir in the lime juice and add salt and pepper to taste.

Arrange the cauliflower on a baking sheet and drizzle evenly with two tablespoons of the olive oil.  Meanwhile, bring a small pot of water to a boil for the peas.

In a small skillet, warm one tablespoon of the olive oil.  When it is shimmering, add the panko crumbs and stir until they are slightly toasted, about three minutes.

Pat the scallops dry and season them with salt and pepper.  Place the cauliflower in the oven and bake until it is brown in spots, about fifteen minutes.  Place a large, oven-safe saucepan over high heat and add the remaining olive oil.

While the oil is heating, combine the panko crumbs with the peanut butter and stir to combine. 

When the oil is shimmering, add the scallops and sear them on one side for approximately four minutes.  Then turn the scallops over and lightly sear for another minute;  then remove the pan from the heat and top each scallop with a dollop of the peanut sauce.

Place the saucepan in the oven for approximately two minutes, which should melt the peanut sauce.  Boil the snow peas for approximately one minute, then immediately drain and rinse in cold water.

Remove the scallops and cauliflower from the oven and plate immediately on a bed of the cauliflower and snow peas.  Once the scallops, cauliflower and snow peas are on the plate, drizzle with a little of the curry oil.  Serve immediately.

Serves 4 as a light main dish.


Friday, April 20, 2012

Better than Starbucks

Yesterday I flew to St. Louis to attend my parents' retirement reception from the small university where they work.  They didn't know I was coming.

I am not normally given to springing huge surprises on people--but in this case it seems to have been very effective, particularly since I walked into the party accompanied by a six foot tall purple and white griffin, presumably beet red.  Did I also mention that despite my theatrical background, I am not given to grand entrances?

Before I rushed off on the redeye Wednesday night, I finished the cake for this month's Cake Slice bakers.  Reader, I have a confession:  I didn't even eat a full slice of it.  Not because the cake was bad, but because I failed to cut a slice and tuck it into my bag, where it would have been most welcome at 3 a.m. somewhere over Canada.

Although I loathe Starbucks on general principles, I will admit to a weakness for their reduced-fat cinnamon coffee cake.  It's tender with a big cinnamon streusel stripe through the middle of it.  This cake one-ups that by adding cardamom and orange zest.  It smelled heavenly out of the oven, and my lucky husband tells me that his colleagues ate this cake in a hot second yesterday. 

Cinnamon Swirl Buttermilk Pound Cake
Adapted from The Cake Book by Tish Boyle

For the streusel:
1/2 cup all-purpose flour
1/2 cup packed dark brown sugar
1/2 tsp. ground cinnamon
3 tbsp. salted butter, melted

For the cake:
2 cups all-purpose flour
1/2 cup cake flour
1 tsp. baking powder
1/4 tsp. baking soda
1/2 tsp. kosher salt
1/4 tsp. cardamom, preferably freshly ground
1 cup unsalted butter, at room temperature
1 3/4 cups granulated sugar
3 large eggs
2 tsp. vanilla extract
1 tbsp. orange zest
1 cup buttermilk

Preheat the oven to 325 degrees.  Prepare a bundt pan by spraying it liberally with baking spray.

In a small bowl, combine the dry ingredients for the streusel with a fork.  Then add the melted butter--I found it worked easiest to mix it in with my fingers until it formed small clumps.

In a medium bowl, sift together the two flours, baking powder and soda, salt and cardamom. 

Using a stand mixer with the paddle attachment, beat the butter on medium speed until it is creamy and paler in color.  Add the granulated sugar in three installments, continuously beating on medium speed until all the sugar is incorporated.  Then add the eggs one at a time, beating well between each one.  Scrape down the bowl and then add the vanilla and orange zest.  Finally, turn the mixer to low and then add the flour mixture in three installments, alternating with the buttermilk.  Beat until just incorporated.

Pour half the batter into the bundt pan, then cover with the cinnamon streusel--it doesn't matter if the streusel layer is precisely even.  Then pour the remaining batter in, smoothing the top.


Bake until a skewer poked into the cake comes out clean, about 65 minutes.  Turn the cake out onto a baker's rack and allow to cool, or in my case, snap a quick picture and then run out the door for the airport.

Makes 12-16 small slices.

Monday, April 16, 2012

Welcome Back, Carbs

The weekend started with promise:  theatre, friends and all day Sunday with nothing on the schedule.  Nothing.  It was the strangest thing, but I drew up a to-do list and we plunged in. 

Cue:  Monday morning with most of the to-do list left undone.  I swear we did not sit around the house yesterday.  Really.

Passover ended at sundown on Friday, and I even waited until 9 p.m. to eat my first slice of bread.  That's really restraint on my part.  It also means that bread, pasta and rice re-entered our house in a big way over the weekend.  Exhibit one:  this hunter's pasta.

This recipe isn't perfect;  I added the peas according to the recipe, but they really could have waited until closer to the end of the process, so I've modified that in the directions below.  This isn't the pasta equivalent of haute couture--think of it as the pasta equivalent of a favorite pair of sweats--comforting and easy to make and eat.  I used a mixture of mushrooms, but you could easily go with just one type, probably the cremini or portobellos.  The more expensive shiitakes can't be tasted enough to justify the expense.

Welcome back, carbs.  How I have missed you.

Also, without being too cute about it, my beloved cat Ingrid was seventeen yesterday.  Here she is is "helping" David make pasta.  I promise this pasta was solely consumed by David and I, as I would not let the cat sit that close to pasta I was making for guests.

 Rigatoni, Woodsman Style
Adapted from Lidia's Italy in America by Lidia Bastianich

1 tsp. sea salt
1 pound dried rigatoni
3 tsp. extra-virgin olive oil
1 medium yellow onion, coarsely chopped
1 lb. Italian chicken sausage, removed from casings
1/2 lb. cremini mushrooms, sliced thickly
4 oz. shiitake mushrooms, sliced thickly
1 large portabello mushroom cap, sliced thickly
6 fresh sage leaves
28 oz. can whole Italian plum tomatoes
1 cup frozen peas
1 bunch green onions, white and dark green parts only, chopped
1/2 cup heavy cream
1 cup good-quality Parmesan cheese, grated

In a medium bowl, crush the tomatoes by hand into small chunks and set aside.

Put on a large pot of water for the pasta and add a pinch of salt. 

Using a large skillet, heat the oil over medium heat.  When the oil is shimmering, add the onion and cook until the onion is slightly translucent, about three minutes.  Then add the sausage and cook thoroughly, using a wooden spoon to further crumble the meat.


Add all the mushrooms at once to the skillet, and cook for an additional two minutes.  Add the sage and tomatoes and bring the mixture to a simmer.  If the sauce is too thick, add a cup of water and return to a simmer.

Hopefully by this time your pasta water is at a boil;  add the rigatoni and cook according to the package until the pasta is al dente.  This should take about ten minutes.  Drain the pasta, reserving up to a cup of the pasta water in case the sauce needs thinning.

Cook the sauce uncovered for approximately ten minutes, then add the green onions and cook until they wilt into the sauce.  Add the cream and stir the sauce thoroughly to incorporate.  If the sauce is too thick, then add the pasta water bit by bit.  When the sauce is almost finished, add the peas and cook just until they are firm but not mushy.


Transfer the pasta to a warmed serving bowl, then add the sauce and toss thoroughly to coat.  Sprinkle some of the Parmesan over the bowl and serve the remainder on the side.

Makes 6 to 8 main-course servings;  could make up to 10 to 12 pasta course servings.

Thursday, April 12, 2012

In Praise of the Potato

There's always a point during Passover when I whine about all the things I can't eat.  I'm a bread person, after all, and much as I like matzoh there comes a point when I get pouty.  My husband David, who is not Jewish despite the fact that he looks more Jewish than I do, occasionally eats a piece of toast while I stare at him in despair.  In his defense, it's probably not much fun for him either.

At this point during Passover, the humble potato becomes a lifesaver.  It's carbalicious, it's warm and satisfying, and it can be made into many different incarnations over the holiday.  Mashed potatoes.  Home fries.  Baked potatoes.  The list goes on.

I am not an enormous fan of potato gratin, or scalloped potatoes, but I recently bought David a copy of Alice Waters' new book.  We knew our seder was going to be of the dairy variety due to the high number of vegetarians, so I found myself looking at dairy-heavy vegetable dishes when I came across this one.

This may be the potato gratin that changes your opinions about potato gratins.  Delicately flavored with bay leaves and fresh thyme, it is creamy but not heavy.  Unlike a lot of potato gratins, there is no cheese, just a combination of milk and cream.

And, if you use a mandoline or food processor to slice the potatoes, it goes together fast.  I had intended to do a delicate overlapping layering of the potato slices, but with fourteen people coming in the door as we were finishing the preparations, it wasn't quite that artistic.  It also accounts for the distinct lack of photos.

This recipe easily doubles.  I recommend you make it immediately before it goes into the oven so the potato slices don't discolor;  you could make the potato slices ahead of time, but Waters warns against putting them in water because the potato starch will be lost.

Alice Waters' Potato Gratin
Adapted from In the Green Kitchen by Alice Waters

2 tbsp. butter, cubed, plus more for buttering the dish
1 1/4 cups heavy cream
1 cup 2% milk
1 tbsp. kosher salt
3/4 cup vegetable stock
2 bay leaves
3 1/2 lbs. Yukon Gold potatoes, peeled
1 tbsp. fresh thyme, chopped
Fresh-ground black pepper

Preheat the oven to 375 degrees.  In a medium saucepan over medium heat, combine the milk, cream, bay leaves, salt and vegetable stock.  Heat the mixture to a simmer;  when it reaches a simmer, reduce the heat to low.

Butter a shallow, medium-sized gratin dish or casserole and set aside.  Slice the potatoes to approximately 1/8 inch thick using either a mandoline or food processor.  Immediately begin layering the potatoes into the casserole, ideally overlapping them.  However, if fourteen people are showing up at your door imminently, throw those potatoes into the dish to the best of your ability.

When the potatoes are in the dish, turn off the heat on the cream mixture and remove the bay leaves.  Pour the warm mixture over the potatoes, stopping just before it gets to the top of the potato slices.  If you overfill, it will spill over in your oven--I can attest to that.

Sprinkle the cubes of butter evenly over the gratin, then cover the pan with foil.  Bake for 35 to 40 minutes;  check to make sure the potatoes can be pierced with a knife.  Then remove the foil, sprinkle the thyme and pepper over the potatoes, increase the heat to 400 degrees and bake for another 25 to 30 minutes, until the potatoes are lightly browned.

At this point, there will be quite a lot of cream in the bottom of the dish.  The dish can be served immediately, or you can let it rest for another 5 to 10 minutes to allow some of the remaining cream to absorb.

Easily serves 8 as a side dish.

Monday, April 9, 2012

And Chaos Ensued

David and I are still cleaning up the kitchen after last night's Passover seder/blowout.  We had our first one two years ago with about six people, last year increased to about eight and this year went full throttle with a crowd of fourteen that included three children and one person that neither of us had previously met (though she was lovely). 

Despite all the careful planning, there were things we had forgotten, like the hand-washing bowl that is a part of the seder.  While dinner was in the oven, the delicious potato casserole boiled over and caused smoke to fill the kitchen and dining room.  We then opened the doors a little earlier than the section where you open them for Elijah--but no matter.  It was a chaotic seder, but everyone had a good time.

Last week I wrote about the challenges of preparing a delicious meal that is not only kosher for Passover (no bread, rice, beans, corn, peas or things that puff when they cook), plus suitable for the one vegan and five vegetarians that were joining us.  What do you serve under these circumstances?We settled on a dairy meal with a fish dish--for those who aren't familiar with the laws of kashrut, certain fish are considered pareve, or neutral--neither meat nor milk. 

Haroset (traditional fruit-and-nut dish that is part of the seder plate, but also delicious)
Matzoh
Herb-crusted halibut
Warm quinoa salad with vegetables
Roasted asparagus
The best scalloped potatoes ever (will be posted later this week)
Various salads and vegetables brought by friends
Gelato and chocolate-covered matzoh for dessert


This is what I get for forgetting take photos until after the meal.
We had a lot of food, and our refrigerator runneth over.  As it turned out, most of the vegetarians were of the pescetarian, a/k/a Alaska vegetarian, variety--eaters of fish but not meat.  That's just as well since David got carried away when he bought the halibut. 

This recipe originally called for salmon, but oddly salmon was selling at a premium yesterday.  It makes no sense, unless it is all the restaurants in the lower 48 buying Alaska salmon that is causing the price hike.  It worked just as well for halibut, a firm, mild white fish that needs adventurous flavors to be at its best.  I doubled the original recipe, but it can be scaled back down if you're feeding less than a crowd.

Herb-Crusted Halibut
Adapted from The Barefoot Contessa's How Easy is That? by Ina Garten

2 cups chopped mixed herbs--parsley, sage, thyme or whatever you have on hand
2 cups chopped green onions, including both the white and green parts
1/2 cup extra-virgin olive oil
4 tbsp. fresh-squeezed lemon juice
1/4 cup dry white wine
5 lb. halibut filet, skin on

Preheat the oven to 425 degrees.  While it is heating, place the halibut skin side down on a rimmed baking sheet.  In a small bowl, combine the lemon juice and olive oil, then pour evenly over the halibut--there may be a bit left over. 

Combine the herbs and green onions, then pat the mixture evenly over the fish.  Pour the wine around the edges of the halibut.

Bake for fifteen to eighteen minutes, or until the thickest part of the fish flakes easily and is opaque.  Remove the fish from the oven and cover with foil for ten minutes.

Easily serves 12 people.

Thursday, April 5, 2012

Two Anniversaries

David and I celebrated our third anniversary yesterday.  We didn't make a big deal out of it, other than going to the Crow's Nest, probably the best restaurant in Anchorage, for dinner.  And here we pause for a slight rant:  why would a top-quality restaurant oversalt its food?  I like salt as much as the next person, and it definitely has its place in seasoning and finishing food, but oversalting a high-quality pepper steak AND its side of wild mushrooms is insane.

And now we return to our previously scheduled programming.

This is also the 100th post on this blog.  If I were more organized today, I'd have a giveaway or something special planned.  Watch for that in the next post.

Tomorrow at sundown, Passover starts.  Since I haven't been home much this week, I still need to quarantine any products with chametz (breads, crackers, rice, beans, cereal, etc.)--anything with leavening or that puffs when it cooks.  

Passover seders are typically held the first and second nights, but due to some guests' scheduling quirks, we are holding ours on Sunday evening.  One of our guests is vegan and five are vegetarian.  It should be a fascinating menu--stay tuned on that too.


In the interest of clearing out some of the chametz before Passover, I give you this onion focaccia.  Made with some of the time-saving shortcuts I talked about here, this takes less than fifteen minutes of active time and may have been the best focaccia yet. 

It's just the right amount of onion-y, and the onions soften and mellow during baking, making it the perfect accompaniment to pasta or a roasted meat.

Onion Focaccia
Adapted from the CIA's Italian Cooking at Home
 
1 cup 2 percent milk
1 tsp. sugar
1 envelope active dry yeast or 2 1/4 tsp. jarred active dry yeast
4 cups all-purpose flour, plus more for shaping bread
3/4 cup warm water
5 tbsp. good-quality olive oil, plus more for oiling the pan
1 tsp. kosher salt
1 small yellow onion (not a sweet onion), cut into thin rings
1 1/2 tsp. coarse flaked sea salt
 
Warm the milk on the stove or in the microwave to 100 degrees.  Cool the warmed milk for a minute, then add the yeast and stir to dissolve.  Set aside for about fifteen minutes;  it should begin to foam.
 
In a stand mixer using the dough hook attachment, combine the flour, two tablespoons of olive oil, the yeast mixture, the water and the kosher salt.  Mix on medium until the dough is smooth and elastic, about five minutes.
Warm your oven to 180 degrees.  While it is warming, take the mixer bowl off the mixer, dust the top of the dough with all-purpose flour and seal tightly with plastic wrap.  Turn off the oven and place the bowl in it.  Let the dough rise until it is about doubled, about half an hour.
 
Flour a work surface and tip the dough onto it.  Using your hands, shape the dough into a rough square, then bring each of the corners to the center.  Turn the dough over and tuck the ends in so the dough is circular.  Cover loosely with plastic wrap and leave it on the counter to relax, about half an hour.
 
While it is relaxing, preheat the oven again.  Prepare your baking pan--I used a small paella pan, which worked perfectly.  Brush the pan with two tablespoons of olive oil, include the sides.  Then pat the dough into the pan using your hands.  Turn off the oven, cover the plan loosely with plastic wrap and allow the dough to rise one more time.  This should take 30-40 minutes.
 
Remove the pan from the oven and preheat to 500 degrees.  Sprinkle the remaining olive oil over it and evenly distribute the onion rings.  Let the dough sit on the counter for a few minutes to allow it to continue rising around the onion rings, as shown here.  Press fingers lightly into dough to create dimples in it and sprinkle the flake sea salt on top.

Bake for about fifteen minutes, until the edges of the bread turn light brown.  Do not overbake--the bread may look slightly underdone, but it will have great texture.  Remove from the oven, cool slightly and cut into wedges.

Makes 10 to 12 good-size focaccia wedges.

Monday, April 2, 2012

Lettuce Entertain You

It's never good to start a Monday exhausted, am I right?

Eleemosynary opened on Friday night, and the actors were wonderful.  I was one kvelling director, and hooray for the great review that appeared online on Saturday.  There were four shows that opened on Friday--in Anchorage, of all places--so we're all fighting for audiences and hopefully the review will help.

On Saturday, I cooked a massive dinner for my mother-in-law Hope.  I seriously lucked out in the mother-in-law situation, although I'm not sure how hyperactive David emerged from fairly zen Hope.  I'm going to be wondering about that one for years.

So Saturday was serious cooking therapy--I'll be posting the results of the session this week.

It's really starting to look like spring in Alaska, which means melting gray snow, roads that are alternately slick and dry and moose ambling out of the woods in search of food further afield.  If you're ever thinking of coming to Alaska, this is probably not the time to do it.

This gorgeous salad is colorful, crunchy and substantial.  With the butter lettuce, it just looks like spring.  Although the original recipe called for baby heads of butter lettuce, no such luck finding those here, so I used a hydroponic full-sized head of butter lettuce.  Although my salads looked nowhere near as gorgeous as the ones in the cookbook, they were still suitable for impressing my mother-in-law.

Butter Lettuce Salad with Lemon-Shallot Vinaigrette
Adapted from the Mozza Cookbook by Nancy Silverton

1 batch lemon-shallot vinaigrette (recipe posted here)
1 head butter lettuce, leaves separated but left whole and thoroughly washed
1 cup hazelnuts, toasted
1 tbsp. hazelnut oil (good-quality olive oil would also work)
1 tsp. kosher flake salt
1/2 red onion, thinly sliced and separated into rings
1/2 small zucchini, shaved with a vegetable peeler
1/2 small yellow longneck squash, shaved with a vegetable peeler
1/2 cup finely grated Parmesan cheese

First, make the vinaigrette.  Then chop the toasted hazelnuts and toss with the oil and salt.

When you have sliced the red onion and divided it into rings, place the rings in a small bowl of ice water until you're ready to use them.

Combine the zucchini and squash shavings in a small bowl and toss with one tablespoon of the vinaigrette. 

Place one large leaf of the butter lettuce on each salad plate.  When you are ready to plate, tear the remaining lettuce into large pieces by hand and toss with the vinaigrette and half a cup of the hazelnuts in a large bowl, being careful not to overdress the salad.  Any remaining vinaigrette will keep in the fridge for at least a week.  Add a small amount of salt and pepper to the dressed salad if necessary.

Mound a small amount of the zucchini-squash mixture on the lettuce leaves on each plate, then carefully pile a small amount of the dressed lettuce on top.  Then carefully slide two rings of the red onion around the lettuce leaves, which should then hold their shape on the plate.

Repeat with the remaining plates, then sprinkle a few additional hazelnuts on each salad and dust with the Parmesan.  Makes six appetizer-size salads.